This article outlines how to configure and use the credit card integration between Spire v3.13 and Global Payments, including both Card Present (CP) and Card Not Present (CNP) processing, MID setup, payment method creation, and transaction workflows.
Last updated: 27 November 2025
Overview and Support
Global Payments is a payment solution provider that integrates with Spire to allow credit card processing for both Card Present and Card Not Present transactions. Spire’s integration supports taking payments through Sales Order Deposits, Sales Invoices, and A/R Invoices and Refunds.
Partners and clients must complete specific steps prior to enabling the integration in Spire Server Administration. This includes account registration with Global Payments and internal setup within Spire.
*Note: Global Payments integration requires that the client maintains their Spire Software Assurance.*
The following is a checklist of steps to complete the Global Payments integration with Spire, starting with a group of tasks that can be performed prior to enabling the integration in Spire Server Administration, followed by tasks that can be done after the integration is completed.
Before You Begin: Spire and Global Payments Setup
Spire Partner & Customer Preparation for Integration
1. Customer needs to apply for a merchant account with Global Payments via this form. If customer has an existing account with Global, a new application is still required.
2. Partner must complete Spire Pre-Integration Check List (see below)
3. Spire Central Global License Activation - Access Customer record in Spire Central. From the top menu, select the Change License. Under Modules select Global Payments. **Note that integration will not work if you have not enabled the Global license for your customer.**
4. Once the customer receives their merchant approval, ID and any terminals required, they will receive an implementation meeting request from Global Payments.
- Our Spire Techinical Suport team will forward the meeting request to the Spire Partner of record
- **Spire Partners are required to prepare for and be present for the scheduled implementation meeting.**
- **Should Spire Partners not be present for the meeting, Global Payments will be required to cancel the meeting and reschedule.
- Please be sure to check your emails for invites from Global.
- Be involved with your client ahead of time to try and schedule a convenient time with them.
- **Should a Spire support ticket need to be issued during the implementation, please respect the following:
- Submit ticket to partnersupport@spiresystems.com
- Include subject line Global Implementation Support
- Include license version
- Include site name
- Incude screen shot if possible
- Include clear steps taken
- Include if for CARD PRESENT or CARD NON PRESENT
5. If the Spire client currently has a credit card processing integration connected to Spire (such as Payfirma), this connection must be disabled before proceeding with the Global Payments implementation.
6. It is up to the customer and the Spire partner to ensure the pre-integration checklist is completed and that the partner is available for the scheduled meeting with Global for the implementation.
7. Confirm client is using hostname to login via Spire Desktop as localhost, IP address or server name will not work with Global Payments.
Global Payments Technical Support
Hardware, Installs, processing issues or otherwise broken, existing merchant hardware orders,
tracking info and incomplete shipments.
Please Note: Post-implementation Global Payments Integration and Terminal support are provided by Global Payments.
Global Payments has put together a dedicated support team for Spire Partners to contact in order to assist their Spire clients with post-implementation Global Payments issues that may arise.
Spire Partners can email: partnersupport@openedgepay.com
If Spire Clients wish to contact Global Payments, they can reach out to the following two departments:
Client Care: customerservice@openedgepay.com
Technical Support: support@openedgepay.com
Spire Pre-Integration Check List Setting Up Payment Methods in Spire
- Go to Edit > Payment Methods.

For integration with Global Payments, at least one Credit-type payment method must be created. Assign a Credit Card Clearing GL account to the payment method.
If your business accepts multiple card types (e.g., Visa, MasterCard), you may wish to create separate payment methods and GL accounts to track them individually. - Create a new payment method record with the Plus (Add) toolbar button, or edit an existing payment method with the Pencil (Edit) toolbar button.


- Code: A unique value for this payment method.
- Description: Identification for users to know the payment method when selecting.
- Type: Credit
- Assign the correct GL Account.
- For use within Sales Orders Display:
- Check Display payment method to allow selection.
- Set the Sequence position for this payment method in the list.
- (Optional) Choose an icon image for display in Sales Orders.
- For defining the Integration with Global Payments:
- Enable the integration
- Set Type to: External Terminal (Card Present)
- Click Save and Close.
10. Ensure that any previously connected payment integrations are disabled.
- From the Spire Server Admin menu, click Integrations.
- Select the currently integrated payment solutions (example Payfirma)
- Click on Manage Access
- Ensure that all databases are checked off as NONE

- If Card Present Trasactions and previously configured terminals are set up via Payfacto, and NEW terminals are being ordered with Global Payments, repeat the same Manage Access steps in the Payfactor connector.
Spire Pre-Integration Check List Tills and Terminals Setup
Create Tills (Optional but Recommended)
Go to Sales > Tills
Create or edit tills to define where terminals are located (e.g., “Front Register”).
If using GL Segments for Location, assign the appropriate Location Code.
Create Terminal Codes
Even if you haven’t received devices yet, you can pre-create terminal entries:
Go to Sales > Payment Terminals
Use the Add (+) button to create each expected terminal.
These will later be configured once the Global Payments software is installed.
(Optional) Multi-Terminal Setup
If you have multiple terminals (e.g. for multi-lane or multi-till setups):
- Go to Sales > Payment Terminals.

- Click the Plus (Add) toolbar button to create a new terminal.

- Code: Name of device (e.g. Register 1)
- Terminal No: Format cedevice::xxxxxx or as provided by global.
- Choose Language and Currency.
- Assign the appropriate Sales Till to assign the location of the device.
- Click Save and Close.
- Repeat for each additional terminal.
Card Present Setup (In-Store Terminals)
(Global Payments will manage this portion set up during imlplementation meeting)
NOTE: If you're evaluating the integration prior to going live, enable the Sandbox Environment option for testing. Each configuration must include a unique Label, Region (USD/CAD), and optional Location, Division, and/or Till if applicable. For multi-currency or multi-location setups, create separate connections with distinct Labels.
1. Setting Up Global Payments Integration in Spire
- From the Spire Server Admin menu, click Integrations.
- Under Global Payments Integrated – Card Present, click SETUP.
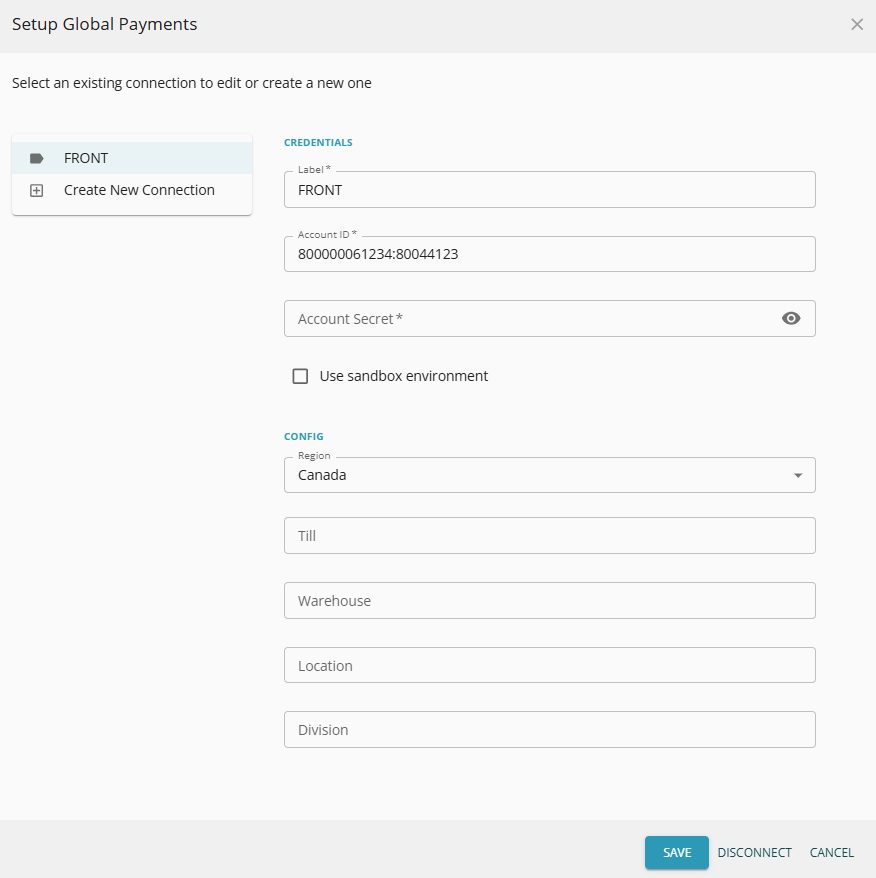
- Give the connection a unique label (e.g., “Main Retail MID”).
- Enter your credentials in format: XWebID:XWebTerminalID.
- Enter your AuthKey as the Account Password.
- Leave the Sandbox Environment checkbox unmarked for live integration.
- Select the appropriate Region (e.g., USD or CAD).
- (Optional) Enter the Till and/or Location and/or Division name if using multiple.
- Click Save.
- For multi-MID setups, click Create New Connection and repeat.

Assign Access
- Click MANAGE ACCESS.

- Enable the databases that should use this MID.
- Click CLOSE.
5. Running a Card Present (CP) Sale
- Confirm you are signed into the same Location, Division, and Sales Till as set up for the terminal in Edit > Change Location
- Go to Sales, click + to create a new sales order.

- Enter sales order information including the Customer No and Part No details.
- Click Invoice.
- Click the Card Present payment icon.
- If prompted, choose the correct device.
- Enter the amount, click OK.
- Follow prompts on the terminal.
- Once complete, click Invoice to finish.
Card Not Present Setup (Manual Entry / Ecommerce)
(Global Payments will manage this portion set up during imlplementation meeting)
NOTE: If you're evaluating the integration prior to going live, enable the Sandbox Environment option for testing. Each configuration must include a unique Label, Region (USD/CAD), and optional Location, Till or Division if applicable. For multi-currency or multi-location setups, create separate connections with distinct Labels.
1. Setting Up Global Payments Integration in Spire
- Still in Integrations, find Global Payments Integrated – Card Not Present.
- Click SETUP.

- Enter a unique label for the account.
- Provide credentials in format: XWebID:XWebTerminalID.
- Enter the AuthKey.
- Leave the checkbox unmarked.
- Select the Region.
- (Optional) Add Till, Location and/or Division if needed.
- Click Save.
- Use Create New Connection to add additional MIDs.

Assign Access
- Click MANAGE ACCESS, enable desired databases.

- Click CLOSE.
2. Setting Up Payment Methods in Spire
- Create a new payment method record with the Plus (Add) toolbar button, or edit an existing payment method with the Pencil (Edit) toolbar button.

- Code: A unique value for this payment method.
- Description: Identification for users to know the payment method when selecting.
- Type: Credit
- Assign the correct GL Account.
- For use within Sales Orders Display:
- Check Display payment method to allow selection.
- Set the Sequence position for this payment method in the list.
- (Optional) Choose an icon image for display in Sales Orders.
- For defining the Integrationwith Global Payments:
- Enable the integration
- Set Type to: External Terminal (Card Present)
- Click Save and Close.
3. Customer Cards with Tokenization (CNP)
- Go to Customers, locate the customer, and edit with double-click or the Pencil icon.

- Open the Credit Cards tab.
- Click the Plus (Add) toolbar button to create a new tokenized card.
- Manually enter the card info.
- Enable Default if this card is typically used for Sales invoices.
- Click Submit, then Save the customer.
4. Deleting a Saved (Tokenized) Card
- Go to Customers, open the customer profile.
- Click the Credit Cards tab.

- Select the saved card.
- Click the X icon to remove it.
5. Sales order entry with Tokenization (CNP)
- Go to Sales, click + to create a new sales order.
- Enter sales order information including the Customer No and Part No details.
- Click Invoice.

- Click the Card Not Present payment icon.

- Select a tokenized (saved) credit card or manually enter a new one.
- (Optional) If a new card was entered, check Save payment method to save the card to the customer.
- Use the Enter Manual Payment process only if you want to escape the integrated entry method and simply enter the information of a credit card payment that has already been externally processed.
- Click OK to process the payment.
- Multiple payments can be taken for the same invoice.
- Click Invoice to complete the sale.
Processes available to both Card Present and Card Not Present transactions
1. Voiding a Transaction (CP Only)
Must be done immediately after sale before invoice is closed.
- On the payment list screen, click Void.
- Select the terminal if needed.
- Follow the device prompts.
- Click Invoice to finalize, or Cancel to escape from this screen without invoicing.
2. Issuing an Independent Refund (CP Only)
- Go to Sales History.
- Double-click the transaction to refund.

- Click Reverse, then Invoice to reverse both the invoice and the payment.

- Select Card Present icon.
- Choose the terminal if prompted. Make sure you are signed into the same till as set on the payment terminal (if using tills).
- Complete prompts and finalize.
3. Authorizing and Capturing Payments
a. Authorization
- Go to Sales, and edit the sales order.
- Click Credit Authorizations.

- Click Authorize, select the integrated credit card payment method.
- Choose the terminal or tokenized customer card, depending on Card Present or Not, and complete prompts.

- Click OK to save the transaction in the Credit Authorizations list.
b. Capture
- Open the order in Sales.
- Click Credit Authorizations to open the list.

- Highlight the saved payment authorization.
- Click Capture to process the payment and remove the authorization from the list.
