Installing and Setting Up the Spire Virtual Appliance
The Spire Virtual Appliance (VA) provides a quick way to run Spire Server in a virtualized environment. This guide outlines system requirements, installation steps, activation, and setup details.
System Requirements
Memory and Performance
The Virtual Appliance automatically adjusts its memory usage by enabling Dynamic Memory by default.
The Virtual Appliance allocates 1 CPU, but this can be increased depending on overall system usage and the number of users.
Network and IP Address on the Hyper-V
- Use an internal network adapter for the virtual machine if the Spire Virtual Appliance is to be used for isolation testing and has no access to the internet.
- Use an external network adapter for the virtual machine if the Spre Virtual Appliance is to be used for day-to-day use and/or requires access to the world network.
To prevent IP address changes (especially on laptops), it may be suggested to use the external network adapter, as it will use the same subnet that is used to access the internet. Where the internal network adapter is using a private subnet isolated from accessing the internet.
If the IP address does change, the system automatically updates its DNS record.
Note: DNS propagation may take several minutes before the new address becomes active.
Troubleshooting
If you are comfortable with Linux or Docker, you can use the command line to diagnose issues.
Otherwise, you can access logs in two ways:
Through the web at:
hostname:10880/setupDirectly in the VM console
Our team continues to monitor and collect feedback from partners to improve this installation process. We appreciate your participation and input.
Installation Overview
When installing the Spire Virtual Appliance for the first time, the Spire Server license must be created and activated before restoring company data or adding users.
A separate Spire Desktop installation is only required if it is a different version than the one that the Spire Partners usually log into. Spire Partners can download the installer from the Partner Portal.
Installation Steps
1. Run the installer.
On the Install SpireOS VM screen:
A default value for the Path to VM storage is provided, but you can modify if you want to store the VM internal data in a different location
Leave checkmark in Create VM unless you are creating the VM manually later
A default value for the VM Name is provided, but you can modify it for clarity by entering a unique name for the VM
Set the Network Switch to Default

If you see a warning that other machines won’t be able to access Spire when using the Default switch, click Yes to continue. This configuration is fine for local installations.

2. Configure the Virtual Appliance
The system begins creating the SpireOS virtual machine.
This process typically takes a few minutes.
Click Log Output to monitor installation progress and review any errors.
When complete, click Continue to begin activation.
Note: You can open Hyper-V Manager and double-click the server name to view its status. If the next screen does not load automatically, refresh your browser.

Activation and Setup
3. Connect to Spire Central
When prompted, click Continue.
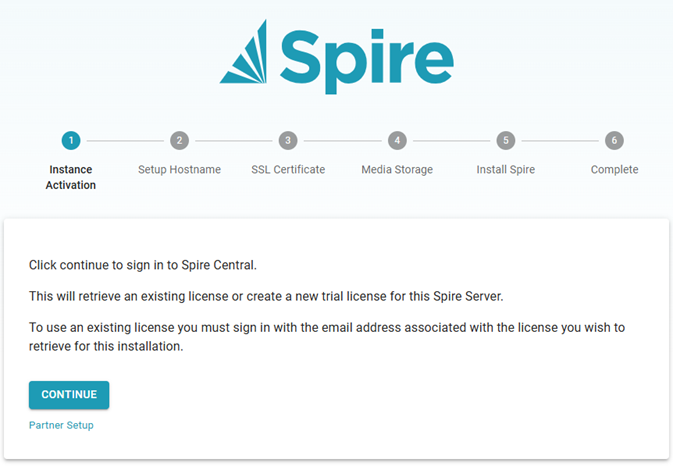
Important Note: If "Partner Setup" is chosen, because this is for a customer, there are a few extra steps.
- After choosing "Partner Setup," the Spire partner will be prompted with a QR code
- Scan the QR code from a different device but it is on the same network
- After the QR code on the different device, it will look similar, showing the QR code. The Spire partner will need to click the "Back" button (located in the bottom left corner).
- Then on the landing page, click "Continue."
- The Spire partner will then see the Spire Central login page. Here is where the Spire partner logs in using the Spire partner credentials.
- After the Spire partner login, go to Step 4, Activate the License
If you are not already signed in:
Choose Sign in with Google, or
Use your existing Spire Central credentials.

Click Log In to proceed.
4. Activate the License
Select Registrant License to Activate.
The activation key will populate automatically.
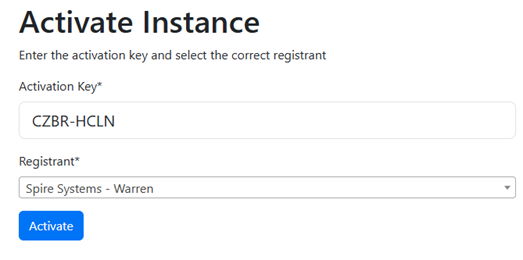
Next, choose an existing hostname if you are replacing a previous connection, or create a new one if you have available capacity.
Record the hostname, as it will be needed when accessing Spire Server Admin/Web or Spire Desktop later.
Click Next.

5. Generate the SSL Certificate

Click Next to begin generating the SSL certificate.
This process can take a few minutes.

When complete, the Spire Sign-In screen appears.
Sign in again using your Google or Spire Central credentials.

6. Configure Media Storage
You can store media files:
Locally on the virtual machine, or
Externally on Amazon or a shared network drive.

If you select Local, confirm responsibility for backups by checking the acknowledgment box.
Click Next to continue.
NOTE: Storage refers to attachments, images, snapshots, archives, and reports, all of which are stored together in a single location.
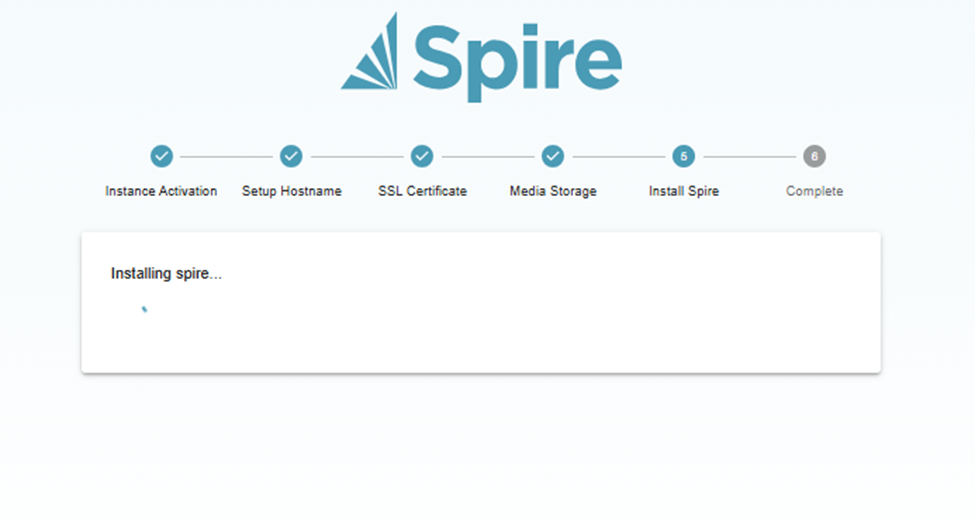
7. Install Spire Server
Select the Spire version you want to install from your available options, then click Next.

The system installs Spire Server Administration on the virtual machine.
After completion, you can click Launch Spire Web to open Spire Server Administration in a browser.
Note: Spire Desktop installation is a separate step and will not be prompted during this setup.

8. Verify the User Account
In Spire Server Administration, open the Accounts list to view user information.
The username is based on the email address used during activation.
Before logging in from Spire Desktop, click the user record to set a password.
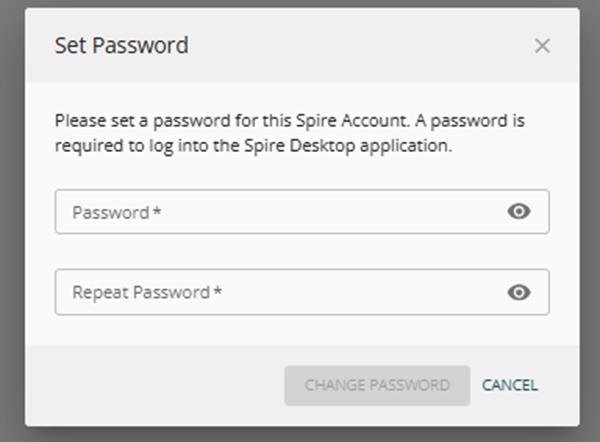
Use the same email and Spire Central password to log into Spire Admin/Web, similar to how Spire Cloud authentication works.
9. Access Spire Server Admin/Web
You can now restore your company data from a snapshot or import an archive.
Import an archive if you need users, media, or custom reports.
10. Start Spire Desktop
When launching Spire Desktop for the first time:
Add the hostname from Step 4 to your server list.
Log in using your verified user credentials.

Summary
The Spire Virtual Appliance provides a streamlined way to deploy Spire Server in a virtual environment with automatic configuration, license activation, and secure SSL setup.
For additional information on Spire Desktop installation or restoring company data, see the related articles below.
Here is a video link for additional references: Spire Virtual Appliance
Related Articles